If you’ve ever clicked on a link only to be met with that dreaded “Page Not Found” message, you know exactly how frustrating it is. Now imagine that happening to YOUR customers when they’re trying to buy something from your store! Yikes! 😬
That’s exactly why I wrote this tutorial. We will talk about all things URL redirects in Shopify and why they are SO important for your online store.
URL redirects are basically digital forwarding addresses that ensure your customers always end up on the right page, even when you’ve moved things around in your shop. It’s just like you forwarding your address at the post office when you move.
The best part? Shopify makes setting these up super simple. By the end of this tutorial, you’ll be creating redirects like a pro, keeping your customers happy, and your Google rankings strong.
So grab your favorite drink (I’ve got my afternoon coffee right here!) and let’s get started ☕
If you prefer a video tutorial to implement a 301 redirect 👇🏽
What Are URL Redirects (And Why Should You Care?)
Imagine this scenario: You’ve been working hard on your Shopify store, carefully organizing your products into collections that make sense. Maybe you started with a collection called “Summer Accessories” but realized “Seasonal Accessories” would work better year-round.
But wait… what happens to all those links pointing to the “Summer Accessories” collection page? What about customers who bookmarked that page? Or what if your social’s or Pinterest are linked to your products there?
Without a redirect, anyone clicking those old links would hit a dead end – that frustrating “404 Page Not Found” error. And trust me, most shoppers won’t take the time to search your site to find where things moved. They’ll just bounce and shop somewhere else.
This is where URL redirects save the day. Think of them like those “We’ve Moved!” signs a physical store would put up – they automatically forward shoppers from an old location to the new one.
Why redirects matter for your shop:
- They keep your customers happy – No dead ends means a smoother shopping experience. Happy shoppers are more likely to become paying customers!
- They protect your SEO – Google doesn’t like sending people to broken pages. If your site has too many broken links, it can actually hurt your ranking in search results. Redirects help maintain your hard-earned SEO juice and keep you visible in searches.
- They preserve your marketing efforts – If you’ve shared links on social media, on Pinterest, in emails, or if other sites have linked to your products, redirects ensure those pathways still lead to your amazing products.
- They make shop reorganization painless – Want to clean up your URL structure or rename collections to target better keywords? Redirects let you make these changes without negative consequences.
I can’t tell you how many times I’ve seen small shop owners neglect this simple step and then wonder why their traffic or sales suddenly dropped. It’s such an easy fix that can save you so much heartache down the road!
Understanding Redirect Types: 301 vs 302
There are two main types of redirects you might hear about, and knowing the difference can help you make better decisions for your shop.
301 Redirects: “We’ve Moved Permanently!”
This is the most common type and what you’ll use most often in your Shopify store.
A 301 redirect is a permanent forwarding address. It tells web browsers and search engines that the old page is gone for good, and the new one should be used from now on.
Think of it like permanently moving your physical store to a new location – you’d put up a sign with your new address and make sure all your mail gets forwarded there. You’d want everyone to update their records with your new location.
The great thing about 301 redirects is that the hard work you did to rank the original page in Google searches isn’t lost!
302 Redirects: “Be Back Soon!”
A 302 redirect is a temporary forwarding address. It’s basically saying, “This page isn’t here right now, but it’ll be back! For now, go check out this other page instead.”
When would you use this? Maybe you’re temporarily out of stock on a popular product and want to direct people to a similar alternative until your restock arrives. Or perhaps you’re revamping a page and need to temporarily point visitors elsewhere.
Here’s the important part: 302 redirects don’t pass along as much SEO value because they’re telling search engines “don’t update your records, this is just temporary!”
Which Type Does Shopify Use?
Shopify’s built-in redirect tool creates 301 (permanent) redirects by default. For most situations, this is exactly what you want!
If you’re:
- Changing product name or collection names
- Reorganizing your shop structure
- Moving from another platform to Shopify
- Permanently discontinuing a product
…then the 301 redirect that Shopify automatically creates is perfect.
For truly temporary situations, you might actually be better off using other approaches (like an “out of stock” notice with similar product recommendations) rather than creating redirects that you’ll have to remember to remove later.
When Do You Need Redirects? 5 Common Scenarios
Here are some common situations when you’ll want to set up redirects in your Shopify store:
1. You’ve Changed a Product or Collection Name
This is super common as your business evolves. Maybe you started with product names that made sense to you but realized they needed to be more descriptive for customers. Or perhaps you’re updating your URLs to target better keywords for SEO.
Example: You changed your collection URL from /collections/handmade-candles to /collections/soy-wax-candles to be more specific about your eco-friendly materials.
2. You’ve Moved from Another Platform to Shopify
This is a big one! Different platforms structure their URLs differently. When you migrate to Shopify, your URLs will likely change even if your product names stay the same.
Example: Your old WordPress/WooCommerce URL might have been /product/blue-ceramic-mug, but on Shopify it becomes /products/blue-ceramic-mug (notice the plural “products” – that’s a common gotcha!).
3. You’re Restructuring Your Store Navigation
As your product line grows, you might reorganize how collections are structured or nested.
Example: You used to have all your planners under /collections/planners but now you’ve split them into /collections/daily-planners and /collections/yearly-planners.
4. You’ve Discontinued Products
When you discontinue a product but don’t want those URLs to lead to dead ends.
Example: You stopped selling your holiday collection after the season ended, but instead of letting those URLs die, you redirect visitors to your year-round collection.
5. You’re Fixing Poor URL Structure
Maybe when you first set up your store, you weren’t thinking about clean, SEO-friendly URLs… your not alone friend.
Example: Changing a product URL from /products/heart-necklace to something more descriptive like /products/minimalist-heart-gold-necklace.
WORTH REPEATING: Any time you change a URL that already exists in your store, you should create a redirect. The costs of not doing it (lost customers, damaged SEO) far outweigh the few seconds it takes to set one up!
Weekly emails for eCommerce shop owners!
Tips, Tricks & Resources to Design, Maintain, and Grow Your eCommerce Store.
Step-by-Step: How to Create 301 URL Redirects in Shopify
Alright, let’s get to the good stuff! Shopify actually makes creating redirects pretty straightforward, there are 2 ways you can do this:
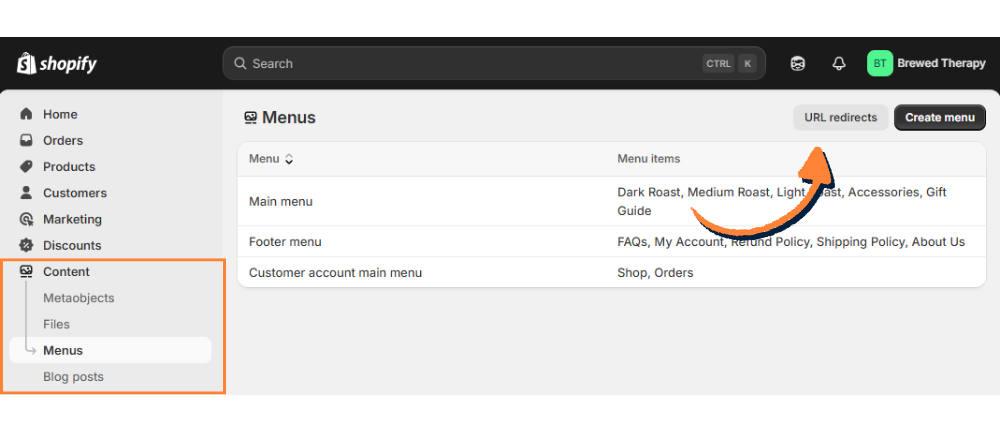
Option 1: Finding the URL Redirects Section
- Log into your Shopify admin (the backend of your store)
- Click on Content in the left-hand menu
- Then click on Menus from the dropdown
- Look for URL redirects in the top right corner of the screen (it’s a bit hidden, honestly!)
- Click that, and you’ll be taken to your redirects page!
If you’ve never created redirects before, this page will probably be empty. Don’t worry – we’re about to change that!
Creating Your First Redirect
Once you’re on the URL redirects page:
- Click the Create URL redirect button in the top right corner
- You’ll see a simple form with two fields: “Redirect from” and “Redirect to”
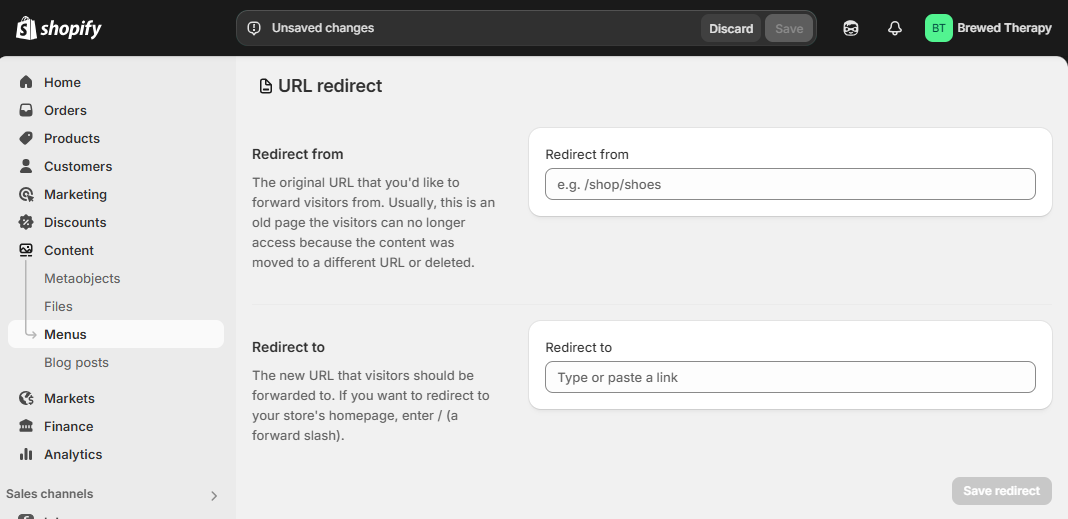
Let’s break down what goes in each field:
The “Redirect from” field
This is your old URL – the one that doesn’t exist anymore (or will soon not exist). You have two options for how to write this:
- Full URL: https://yourstorename.com/collections/summer-candles
- Relative URL: /collections/summer-candles (just the part after your domain name)
Both work! I personally prefer using relative URLs (the second option) because they’re shorter and less prone to typos.
Pro tip: Make sure to include that forward slash (/) at the beginning of your relative URLs! Shopify needs it to understand that you’re talking about a path on your website.
The “Redirect to” field
This is your new URL – where you want visitors to go instead. Again, you can use either:
- Full URL: https://yourstorename.com/collections/candles
- Relative URL: /collections/candles
- Once both fields are filled in, click Save redirect
And boom! 🎉 Your redirect is now active. Anyone trying to visit the old page will be automatically sent to the new one.
Quick Tips for Creating Redirects
- Be exact with your URLs: Make sure you type the URLs exactly as they appear.
- One redirect per old URL: You can’t have multiple redirects from the same source URL.
- Avoid redirect chains: If Page A redirects to Page B, and later you want to redirect Page B to Page C, update the first redirect to go directly from A to C.
Option 2: Shopify’s Automatic Redirect Feature: A Time-Saver
Here’s something I absolutely LOVE about Shopify (and honestly, it’s a feature that saves us so much time): when you change a product or collection URL directly, Shopify will offer to create a redirect automatically! How awesome is that?
How the Automatic Redirect Works
When you’re editing a product or collection and change its URL handle (the last part of the URL), Shopify is smart enough to recognize this change could break existing links. So it asks if you want to create a redirect! Here’s how to do it:
- Go to a product or collection in your Shopify admin
- Scroll down to the Search engine listing section and click Edit (pencil icon)
- You’ll see the URL handle field (this is the last part of your URL)
- Change the handle to your new, preferred URL name
- When you save, Shopify will show a checkbox asking if you want to create a redirect!
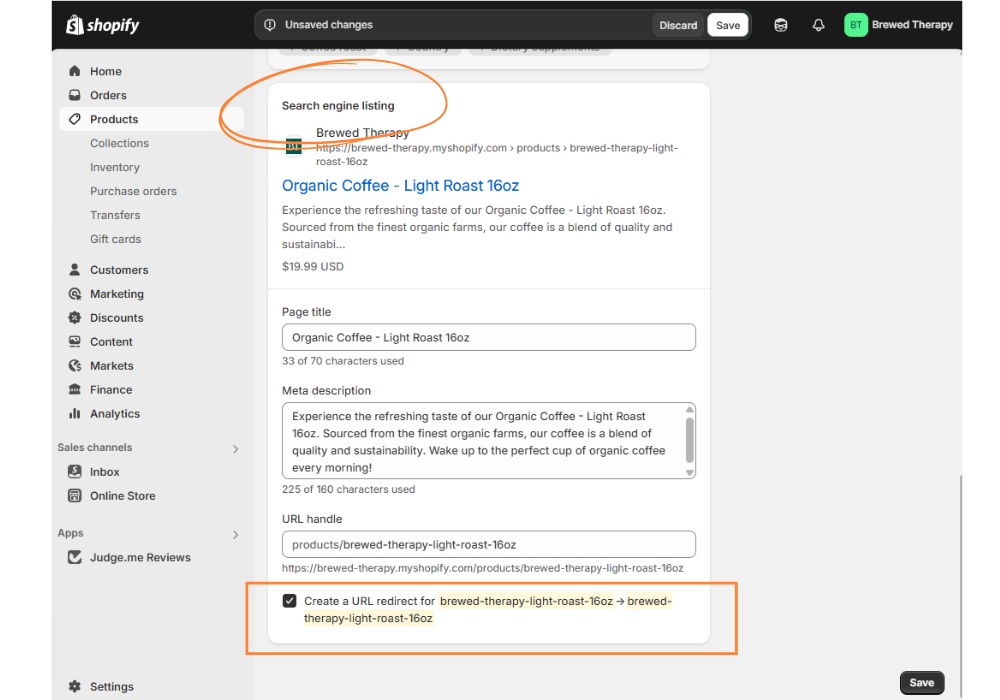
ALWAYS check this box! Unless you have a very specific reason not to, having this redirect is extremely helpful.
Honestly, this little feature has saved me countless hours of work. One of my clients was renaming all her product URLs to be more SEO-friendly – we’re talking about 75+ products! The automatic redirect option made what could have been an afternoon-long project take about 1 hour. Talk about a time-saver! ⏰
Where to Find Your Automatic Redirects
These automatic redirects aren’t stored separately – they show up in the same URL redirects list we looked at earlier (under Content → Menus → URL redirects).
This means you can manage all your redirects in one place, whether you created them manually or Shopify created them automatically!

Step-by-Step: How to Create 302 URL Redirects in Shopify
So we’ve covered permanent redirects, but what about those situations where you only need a temporary detour?
Since Shopify’s built-in redirect tool creates 301 (permanent) redirects by default, I wanted to share some workarounds for those “be back soon” situations!
Option 1: The Best Way, No Redirect Needed! 😲
For most products that are just taking a temporary out-of-stock, the best and easiest approach is often to not create any redirect at all!
Instead, manage the product page directly:
- Keep the product page live. Don’t delete it or hide it completely from your store.
- Clearly mark it as “Out of Stock.” Shopify often does this automatically when your inventory for that product hits zero.
- Offer a way for customers to get updates: Add a “Notify Me When Back in Stock” button (many Shopify themes and apps offer this). This is great for keeping customers interested and capturing future sales.
- Suggest alternatives: On the out-of-stock product page, show recommendations for similar products that are currently in stock.
Why this is often better than a redirect for out-of-stock items:
- Better for Google (SEO): Google sees the product page, understands it’s just temporarily out of stock, and keeps its “link power” (which helps with search rankings) with that page.
- Clearer for Customers: They land on the actual product page and understand why they can’t buy it right now, along with helpful options.
- Less Work for You: You don’t have to remember to remove a redirect later when the product is back in stock.
I can’t tell you how many times I’ve seen shop owners create redirects for out-of-stock items, only to forget all about them when the products are back in stock! Trust me, this approach saves so much headache.
Option 2: Using a Shopify App
If you have more advanced needs for temporary redirects, or if you frequently have pages that need to be temporarily sent elsewhere, you can explore apps in the Shopify App Store. These apps can offer more precise control over redirect types (like true 302s).
Go to the Shopify App Store and search for terms like “redirects,” or “SEO redirects.” Many of these apps provide more features than Shopify’s built-in tool, such as:
- Options to choose between 301 or 302 redirects.
- Automatic broken link detection.
- More ways to create advanced redirect rules.
- Tracking and reporting on your redirects.
Do you really need an app? For most DIY shop owners, option 1 (managing the product/collection page itself) is usually enough for temporary situations. Only consider an app if your temporary redirect needs become very frequent or complex.
Option 3: Use Your Domain Provider
Some domain providers like Cloudflare, GoDaddy, and Namecheap allow you to manage 302 redirects there. So it’s worth checking them out, head over to your domain provider’s support or help docs.
Most Shopify store owners won’t need a 302 redirect — but if you’re running time-sensitive promos, doing A/B testing, or just want to temporarily move traffic around, it’s good to know the option exists.
Remember, the goal is to create the smoothest shopping experience possible while keeping your workflow manageable. Sometimes the simplest solution (no redirect at all!) is actually the best one. 💕
Testing Your Redirects: The Critical Step Most Shop Owners Skip
Always, Always, ALWAYS test your redirects after creating them.
I know testing sounds boring (trust me, I’d rather be designing pretty product pages too!), but this simple step can save you from losing sales and frustrating customers. Even with a platform as user-friendly as Shopify, technology sometimes has a mind of its own.
How to Test Your Redirects
Testing is super simple and takes just a few seconds:
- Copy the old URL (the “Redirect from” address)
- Open a new browser tab (this is important – don’t use the same tab)
- Paste in the full address (including your domain name if you used a relative URL)
- Hit Enter
If your redirect is working correctly, you should be automatically taken to the new page! voila!
If instead you see a “Page Not Found” error (that dreaded 404), something went wrong with your redirect and you need to fix it.
Troubleshooting: Common Redirect Problems
If your redirect isn’t working, here are the most common culprits:
1. Missing the Forward Slash
This is probably the #1 mistake I see. Remember, relative URLs need to start with a forward slash!
- ❌ Wrong: collections/winter-scarves
- ✅ Right: /collections/winter-scarves
2. Typos or Capitalization Issues
URLs are case-sensitive, so be exact!
- ❌ Wrong: /collections/WinterScarves
- ✅ Right: /collections/winter-scarves (if that’s how it appears in your URL)
3. Extra Spaces
Spaces can sneak in when copying and pasting URLs.
- ❌ Wrong: /collections/winter-scarves (notice the space at the end!)
- ✅ Right: /collections/winter-scarves
4. Wrong Formatting of Special Characters
Some special characters need to be encoded in URLs.
- ❌ Wrong: /collections/mens&womens
- ✅ Right: /collections/mens-womens (Shopify usually converts special characters to dashes in URLs)
Testing Multiple Redirects
If you’ve set up several redirects at once (like during a store reorganization or platform migration), don’t try to test them all manually. That would take forever!
Instead, use a tool like SEOAnt-404 Link Redirect in the Shopify App Store or Ahrefs’s broken link check for free to check for 404 errors across your site. It can crawl your site and find any broken links that might need redirects.
URL Redirect Best Practices for Shopify Store Owners
Now that you know how to create and test redirects, let’s talk about some best practices that will help you keep your store running smoothly. These are things I’ve learned from working with Shopify stores – sometimes the hard way! 😅
Keep Track of Your Redirects
If you’re making more than a few redirects, it’s super helpful to keep a record outside of Shopify. A simple spreadsheet with columns for:
- Old URL
- New URL
- Date created
- Reason for redirect
This becomes especially valuable if you’re doing a big site reorganization or platform migration. Trust me, when you have 50+ redirects, you’ll be glad you have this record!
Regularly Check for 404 Errors
Even with the best redirect strategy, broken links can still happen. Maybe you missed a URL, or perhaps there are external sites linking to pages you didn’t know about.
Set a calendar reminder to check for 404 errors at least once a month. You can find these in Google Search Console (it’s free and super valuable for all site owners!).
Don’t Create Redirect Chains
A redirect chain happens when:
- Page A redirects to Page B
- Page B redirects to Page C
This makes your site slower and can dilute SEO value. If you need to redirect Page B to Page C, go back and update the first redirect so Page A goes directly to Page C.
Choose Thoughtful Redirect Destinations
When redirecting, especially for discontinued products, think carefully about where to send visitors:
Good options:
- A similar product (best option if available)
- The category/collection the product belonged to
- A curated “you might also like” page
Not-so-good options:
- Your homepage (too generic)
- A completely unrelated product (confusing for shoppers)
- Your contact page (unless the product was custom/made-to-order)
Don’t Redirect to External Sites
Keep your redirects within your own domain. Redirecting to external websites can confuse visitors and potentially harm your SEO.
Mind Your Redirect Limits
Shopify does have a published limit on how many redirects you can create. If you find yourself exceeding the number of redirects, you might want to upgrade to the Shopify Plus.
Better Redirects, Better Business!
Phew! We’ve covered a lot about URL redirects in this tutorial. I know it might not be the most glamorous part of running your online store (unlike picking pretty themes or taking gorgeous product photos), but proper redirects are like the plumbing of your website – you only really notice them when something goes wrong!
The great news is that now you know exactly how to create, test, and manage redirects in your Shopify store! And remember – Shopify’s automatic redirect feature makes this even easier than on many other platforms.
Do you have questions about redirects or other Shopify challenges? Drop them in the comments below! I read every single one and love helping you make your online store the best it can be. ✨
And if you found this tutorial helpful, I’d be super grateful if you’d share it with another shop owner who might need it. We’re all in this small business journey together!
Ready for Expert Shopify Help?
Still struggling with redirects or other technical aspects of your Shopify store? I offer 1:1 strategy calls where we can tackle your specific challenges together.
👉 Book your Shopify Strategy Session
Or check out my YouTube channel for more free Shopify tutorials!