Hola! We are back with another tutorial on borders! If you are looking to add borders around individual blocks then you are in the right place! We will add borders to the Image with Text and Multicolumn blocks. You can apply this same concept to other blocks in the same way.
This tutorial is piggybacking off of last week’s post on how to add section borders. So check it out if you missed it, but it’s not needed as we will go into it again here!
If you are new to using CSS, not a problem my friend! This guide is perfect for beginners. I’ll walk you through it step-by-step.✨
Below is the corresponding tutorial over on my YouTube channel. If you already watched the video then you’re already on the right track. Continue reading for all the ways to customize the CSS code, YASS their is more! 🫶🏽
Want to watch the tutorial instead? Click 👇🏽
How to add borders to different element/block types in Shopify
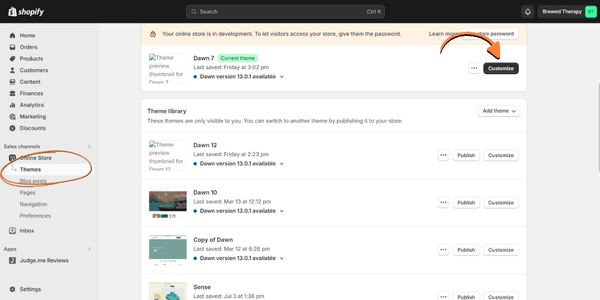
Begin by heading over to your Shopify admin and navigate to the “Online Store” section. From there, click on “Themes.” Locate the theme you want to apply the border too and click on “Customize.”
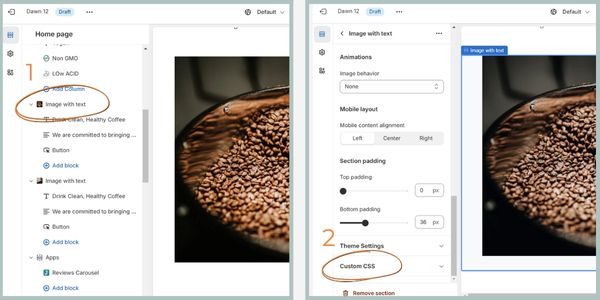
STEP 1: Choose the Section you want to customize (Image with Text or Multicolumn).
Once you’re inside the theme customizer, it’s time to choose the section you want to jazz up with a border.
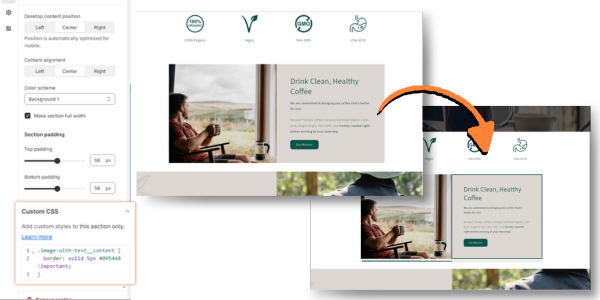
Within the theme editor, you’ll be able to customize various aspects of your store’s design. Decide which block you want to add a border to. Once you’ve selected the section (which has the block you want to add the border too) click on the section, and scroll down to the very bottom of the editor to find the Custom CSS panel. This is where the magic happens!
The code you add here will only affect the selected block. If you want borders on other blocks, you can simply repeat the process for each one.
STEP 2: Adding the Border CSS Code
Below, you will find the various code for this tutorial. Copy and paste the code into the Custom CSS and you will immediately see the borders take effect.
Image with Text Section Image Border:
/*image border*/.media {
border: solid 5px #095448 !important;
}
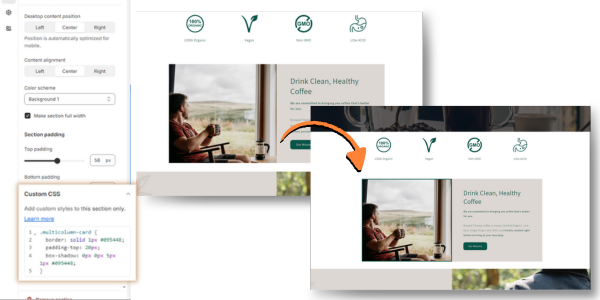
Image with Text Section Text Block Border:
/*content border*/.image-with-text__content {
border: solid 5px #095448 !important;
}
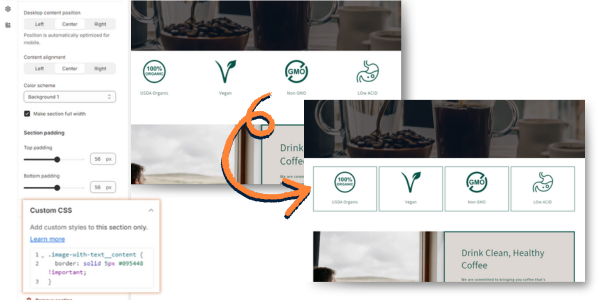
Multicolumn Section Column Borders:
/*column borders*/
.multicolumn-card {
  border: solid 1px #095448;
  padding-top: 20px; /*you can increase/decrease the padding if needed*/
 }
STEP 3: Click SAVE
STEP 4: Customize the code to reflect your brand
Jump to the Decoding and Customizing section below to understand the code and how to customize it so it reflects your brand aesthetics, have fun!
Weekly emails for eCommerce shop owners!
Tips, Tricks & Resources to Design, Maintain, and Grow Your eCommerce Store.
Understanding and Customizing the Borders
The beauty of CSS is that you can play around with it to create the perfect look for your store. Here’s a breakdown of the code to help you customize it:

- Border Property (1): This lets you choose where you want the border to appear. Here are some options:
- Border – Border wraps around the entire section
- border-top – Defines a top border only
- Border-bottom – Defines a bottom border only
- Border-left – Defines a left border only
- Border-right – Defines a right border only
- Border Style (2): You have the freedom to choose the type of line around your border! Play around with the following values:
- dotted – A line that consists of dots.
- dashed – A line that consists of dashes.
- solid – A solid, continuous line.
- double – Two lines are drawn around the element.
- groove – Adds a bevel based on the color value in a way that makes the element appear pressed into the document. The effect depends on the border-color value.
- ridge – Adds a bevel based on the color value in a way that makes the element appear pressed into the document. The effect depends on the border-color value.
- inset – Adds a split tone to the line that makes the element appear slightly depressed. The effect depends on the border-color value
- outset – Similar to inset, but reverses the colors in a way that makes the element appear slightly raised. The effect depends on the border-color value
- Border Width (3): Want a thin border or a bold statement piece? Adjust the height (in pixels) to your liking.
- Border Color (4): Pick a color that complements your brand’s vibe! Simply enter the hex code, and voila! You can also use RGB, and HSL color values.
- !Important (5): This is an optional addition. Sometimes, you might need to emphasize that your CSS rules should override any conflicting styles.
Bonus CSS Code:
Want to soften up the corners of the borders a bit?! You can easily soften the edges of your borders to create a softer feel or leave it as is for a modern look.
Tip #1: How to Round the Border Corners
You can soften the edges of the corners in 2 ways:
Option #1: Inside the Theme setting.
Within the Theme Editor go to Theme settings (top left hand side) > Content containers > Corner radius > set the radius to your preference.
Option #2: Inside the section Custom CSS:
- Locate the Border Code: Within your custom CSS section (as mentioned in Step 2 of the main guide), find the code you added for the border.
- Introducing border-radius: After the last semicolon (;) enter border-radius: Xpx; Replace “X” with your desired curvature value. The higher the value, the rounder the corners will become.
/*Section Border with corner radius*/
 {
border: solid 10px #095448 !important;
border-radius: 10px;
}
This will add a 10px rounded edge to the border. Don’t forget to Save the changes.
Tip #2: How to Add Shadow to Borders
You can soften the edges of the borders in 2 ways:
Option #1: Inside the Theme settings.
Within the Theme Editor go to Theme settings (top left hand side) > Content containers > Shadow > set the Opacity, Horizontal offset, Vertical offset, and Blur your preference.
Option #2: Inside the section Custom CSS:
- Locate the Border Code: Within your custom CSS section (as mentioned in Step 2 of the main guide), find the code you added for the border.
- Introducing box-shadow: After the last semicolon (;) enter box-shadow code: Xpx #hex-color; Replace “X” with your desired effect and color.
/*Section Border with Shadow*/
 {
border: solid 2px #095448 !important;
box-shadow: 0px 0px 10px 10px #000;
}
Decoding and box-shadow CSS
Here’s a breakdown of the code to help you customize it:
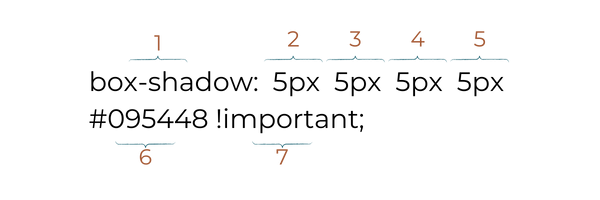
- Box-Shadow Property (1): This property is used to add shadows to elements. It can take multiple values to define the different aspects of the shadow.
- Values:
- (2) – This is the horizontal offset of the shadow. A positive value moves the shadow to the right, and a negative value moves it to the left.
- (3) – This is the vertical offset of the shadow. A positive value moves the shadow down, and a negative value moves it up.
- (4) This is the blur radius of the shadow. A higher value creates a softer, more blurry shadow.
- (5) This is the spread radius of the shadow. A positive value makes the shadow larger, and a negative value makes it smaller.
- Play around with the values in the properties to achieve the specific shadow effect you desire. Change the offsets, blur radius, spread radius, and color to create different shadow styles.
Experiment and Have Fun with CSS
The beauty of CSS customization is how flexible it is. Feel free to experiment with different styles, heights, values, and colors until you find the perfect combination for your brand.
Here is some code to try:
/*image with text border with shadow*/
.media {
  border-bottom: solid 1px #095448 !important;
  margin-bottom: 30px;
  box-shadow: 5px 5px 5px 1px #095448;
}
.image-with-text__content {
  border-right: solid 1px #095448 !important;
  border-bottom: solid 1px #095448 !important;
  box-shadow: 5px 5px 5px 1px #095448;
}
/*multicolumn border with shadow*/.multicolumn-card {
border: solid 1px #095448;
padding-top: 20px;
box-shadow: 0px 0px 5px 1px #095448;
}
You made it to the end! Create unique borders that reflect your brand and let your store stand out! Share your creations with me, I would love to see your designs, tag me on Insta @betsy_oficial/ 🤩
YOU GOT THIS!
Betsy
FAQs
Can I add borders to any section of my Shopify store?
Yes! You can add borders to almost any section of your Shopify store using CSS customization. Whether it’s the announcement bar, product information, or any other section where the Custom CSS box is available.
Do I need coding experience to add borders to my Shopify website?
While some basic understanding of CSS can be helpful, you don’t necessarily need any experience. This tutorial is designed for beginners, so just follow along and make sure you use the code correctly..
Will adding borders affect my website’s loading speed?
In most cases, the impact on loading speed should be minimal. Borders are relatively lightweight and shouldn’t significantly increase page load times.
What if I want different border styles for different sections?
No problem! The beauty of CSS is its flexibility. You can create separate code variations for each section to achieve the desired border styles.
Can I add borders to other elements on my Shopify store, besides sections?
Absolutely! CSS can be used to style various elements in your store, like buttons, product images, and text. However, the specific steps might differ depending on the element you’re targeting.