Are you looking to adjust the default font size across your entire Shopify website? Whether you want to make your fonts bigger or smaller, you’re in luck! In this guide, we’ll show you 2 ways to adjust the font size across your entire website.
When it comes to designing your Shopify website, getting the typography just right can make a big difference in how your brand is perceived. Whether you’re a seasoned Shopify user or just starting out, this guide will help you navigate the process.
One IMPORTANT note before you continue. This tutorial can be used on any of Shopify’s free themes. However the same process can be used on premium themes. The file names and location can be different.
Want to watch the video tutorial instead? Head over to YouTube👇🏽
Option 1: Easy Way To Change The Default Font Size Via The Theme Editor
The easiest way to make changes that affect your entire website is via the Shopify theme editor.
- Log in to your Shopify admin and navigate to Online Store > Themes.
- Choose the theme you want to edit and click Customize.
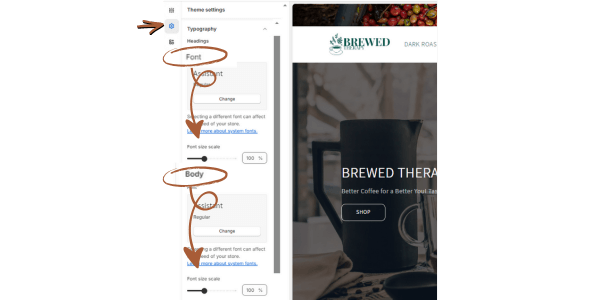
- Select Theme settings (top, left), then select Typography.
- Here, you can adjust the font size for Headings and Body text using the Font size scale.
- Save!
Option 2: Advanced Way To Change The Default Font Size Via The Code Editor
If you want greater control over font sizes, you can make changes in the code editor. By making changes to the settings schema, you can customize font sizes beyond the default options provided in the theme editor.
2 Important Notes:
- Before making any code changes, it’s important to duplicate your theme and work on the copy. This prevents accidental modifications that can break your live website. To duplicate the theme, simply click on the ellipsis (…) to the left of the Customize button, and then select Duplicate.
- The location and name of the file differs from theme developer to theme developer. The code may be located under theme.scss.liquid, and the name could be “base_size”
- Log in to your Shopify admin and navigate to Online Store > Themes
- Click (…) to the left of the theme you want to edit and select Edit code.
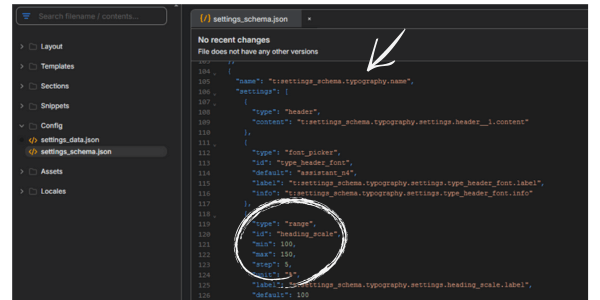
- Locate the Config folder and click on settings_schema.json.
- Search for “heading_scale“, this controls the heading font size range. And/or “body_scale”, this controls the body font size range.
- Change the default values to your desired minimum “min” and maximum “max” font size (NOTE: use % not px for the size).
- Don’t forget to save!
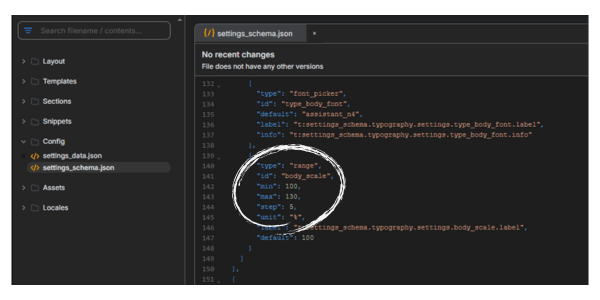
Head to the Theme customizer > Typography. You should now see the font size range you entered, allowing for finer control over your website’s typography. You may have to refresh the screen.
Pssssst…. You can 📌 pin this tutorial for reference to your Shopify Board on Pinterest! 👍🏽
Testing and Saving Changes
Before making any changes to your live site, be sure to test your adjustments in a duplicate theme. This ensures that your changes won’t disrupt the functionality of your website. Once you’re satisfied with the results, you can save your changes and apply them to your live site.
Conclusion
And there you have it! By following these methods, you can easily adjust the font size on your Shopify website to achieve the perfect look and feel for your brand.
If you found this guide helpful, be sure to check out our other Shopify text customization tutorials over on my YouTube channel. And if you have any questions or need further assistance, don’t hesitate to comment below.
You Got This!
Betsy
FAQs
What is the optimal font size?
In general, a font should be a min of 16px for readability.
What is the minimum font size?
In general, the smallest font size you should be 14px.
You May Be Interested In…
📖 On the Blog:
How to add Borders to Individual Elements/Blocks in Your Shopify Store
Shopify Layout: Hide Desktop Sections & Create Mobile-Only Sections with CSS
📺 On YouTube:
How to Change the Image Banner Font Sizes | Shopify
Resize ONLY the Text of the Rich Text Section
How to Change the Button and Badge Text in Shopify

